The following outlines the prerequisites and steps to participate in a Telehealth (remote) session with your practitioner and how to perform a remote body-field scan. Feel free to contact us with any of your questions via email to assistance@juneva.com, or call us at 1-855-688-3760 and select option 3.
IMPORTANT! Keep in mind when you book your first Telehealth (remote) appointment to allow enough time (a) for you to receive the Mobile Scanner or miHealth device you ordered, unless you already have one or will do a voice scan; and (b) for you to complete the necessary prerequisite installation and configuration steps as outlined below. Allow for at least 5-7 business days for the Mobile Scanner or miHealth device to arrive.
Click on ‘TELEHEALTH SESSION‘ or ‘DEVICE SCAN‘ or ‘VOICE SCAN‘ tab below to view more information.
How To Join a Telehealth Session
You can attend a Telehealth (remote) session from anywhere, anytime using (1) a desktop/laptop computer; (2) a broadband internet connection; and (3) a supported web browser (Chrome, Firefox, Edge or Safari). No download needed.
Please review or download our Telehealth QuickStart Guide before your telehealth session to ensure a smooth experience.
OPTION #1
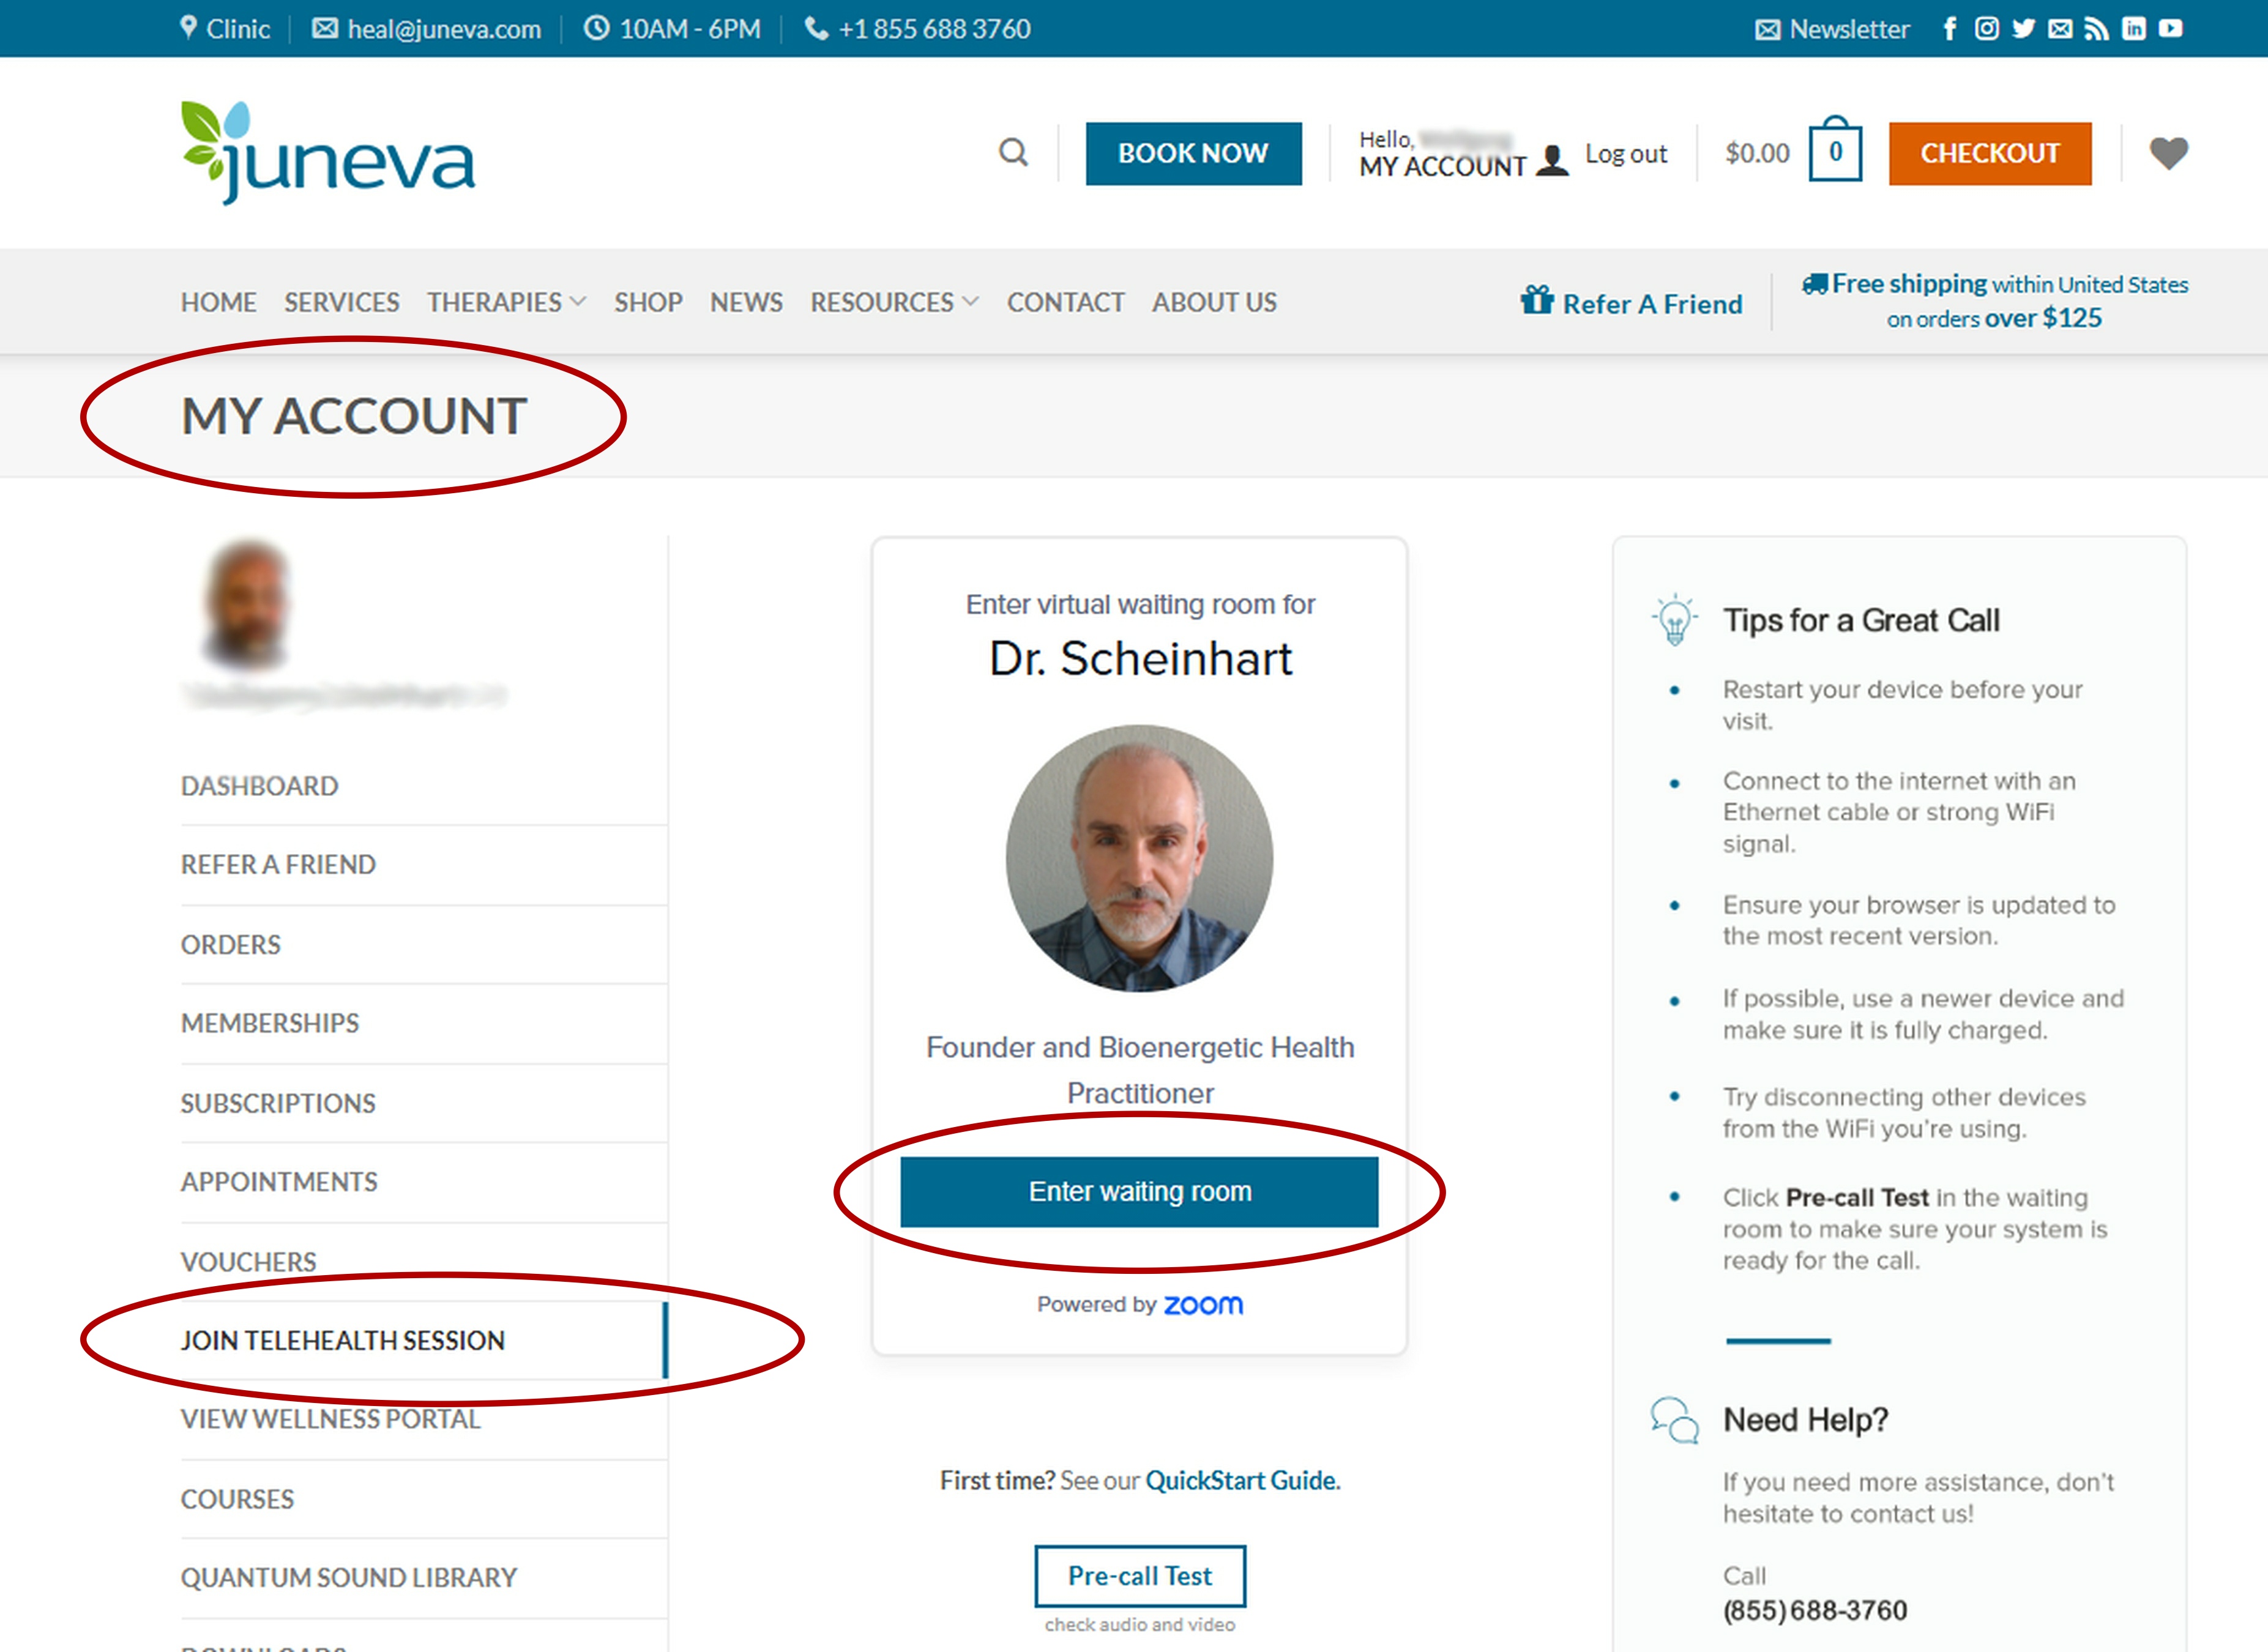
Simply join your Telehealth (remote) session by clicking your practitioner's 'Enter waiting room' button in the 'Join Telehealth Session' selection within your 'My Account' area.
OR
OPTION #2
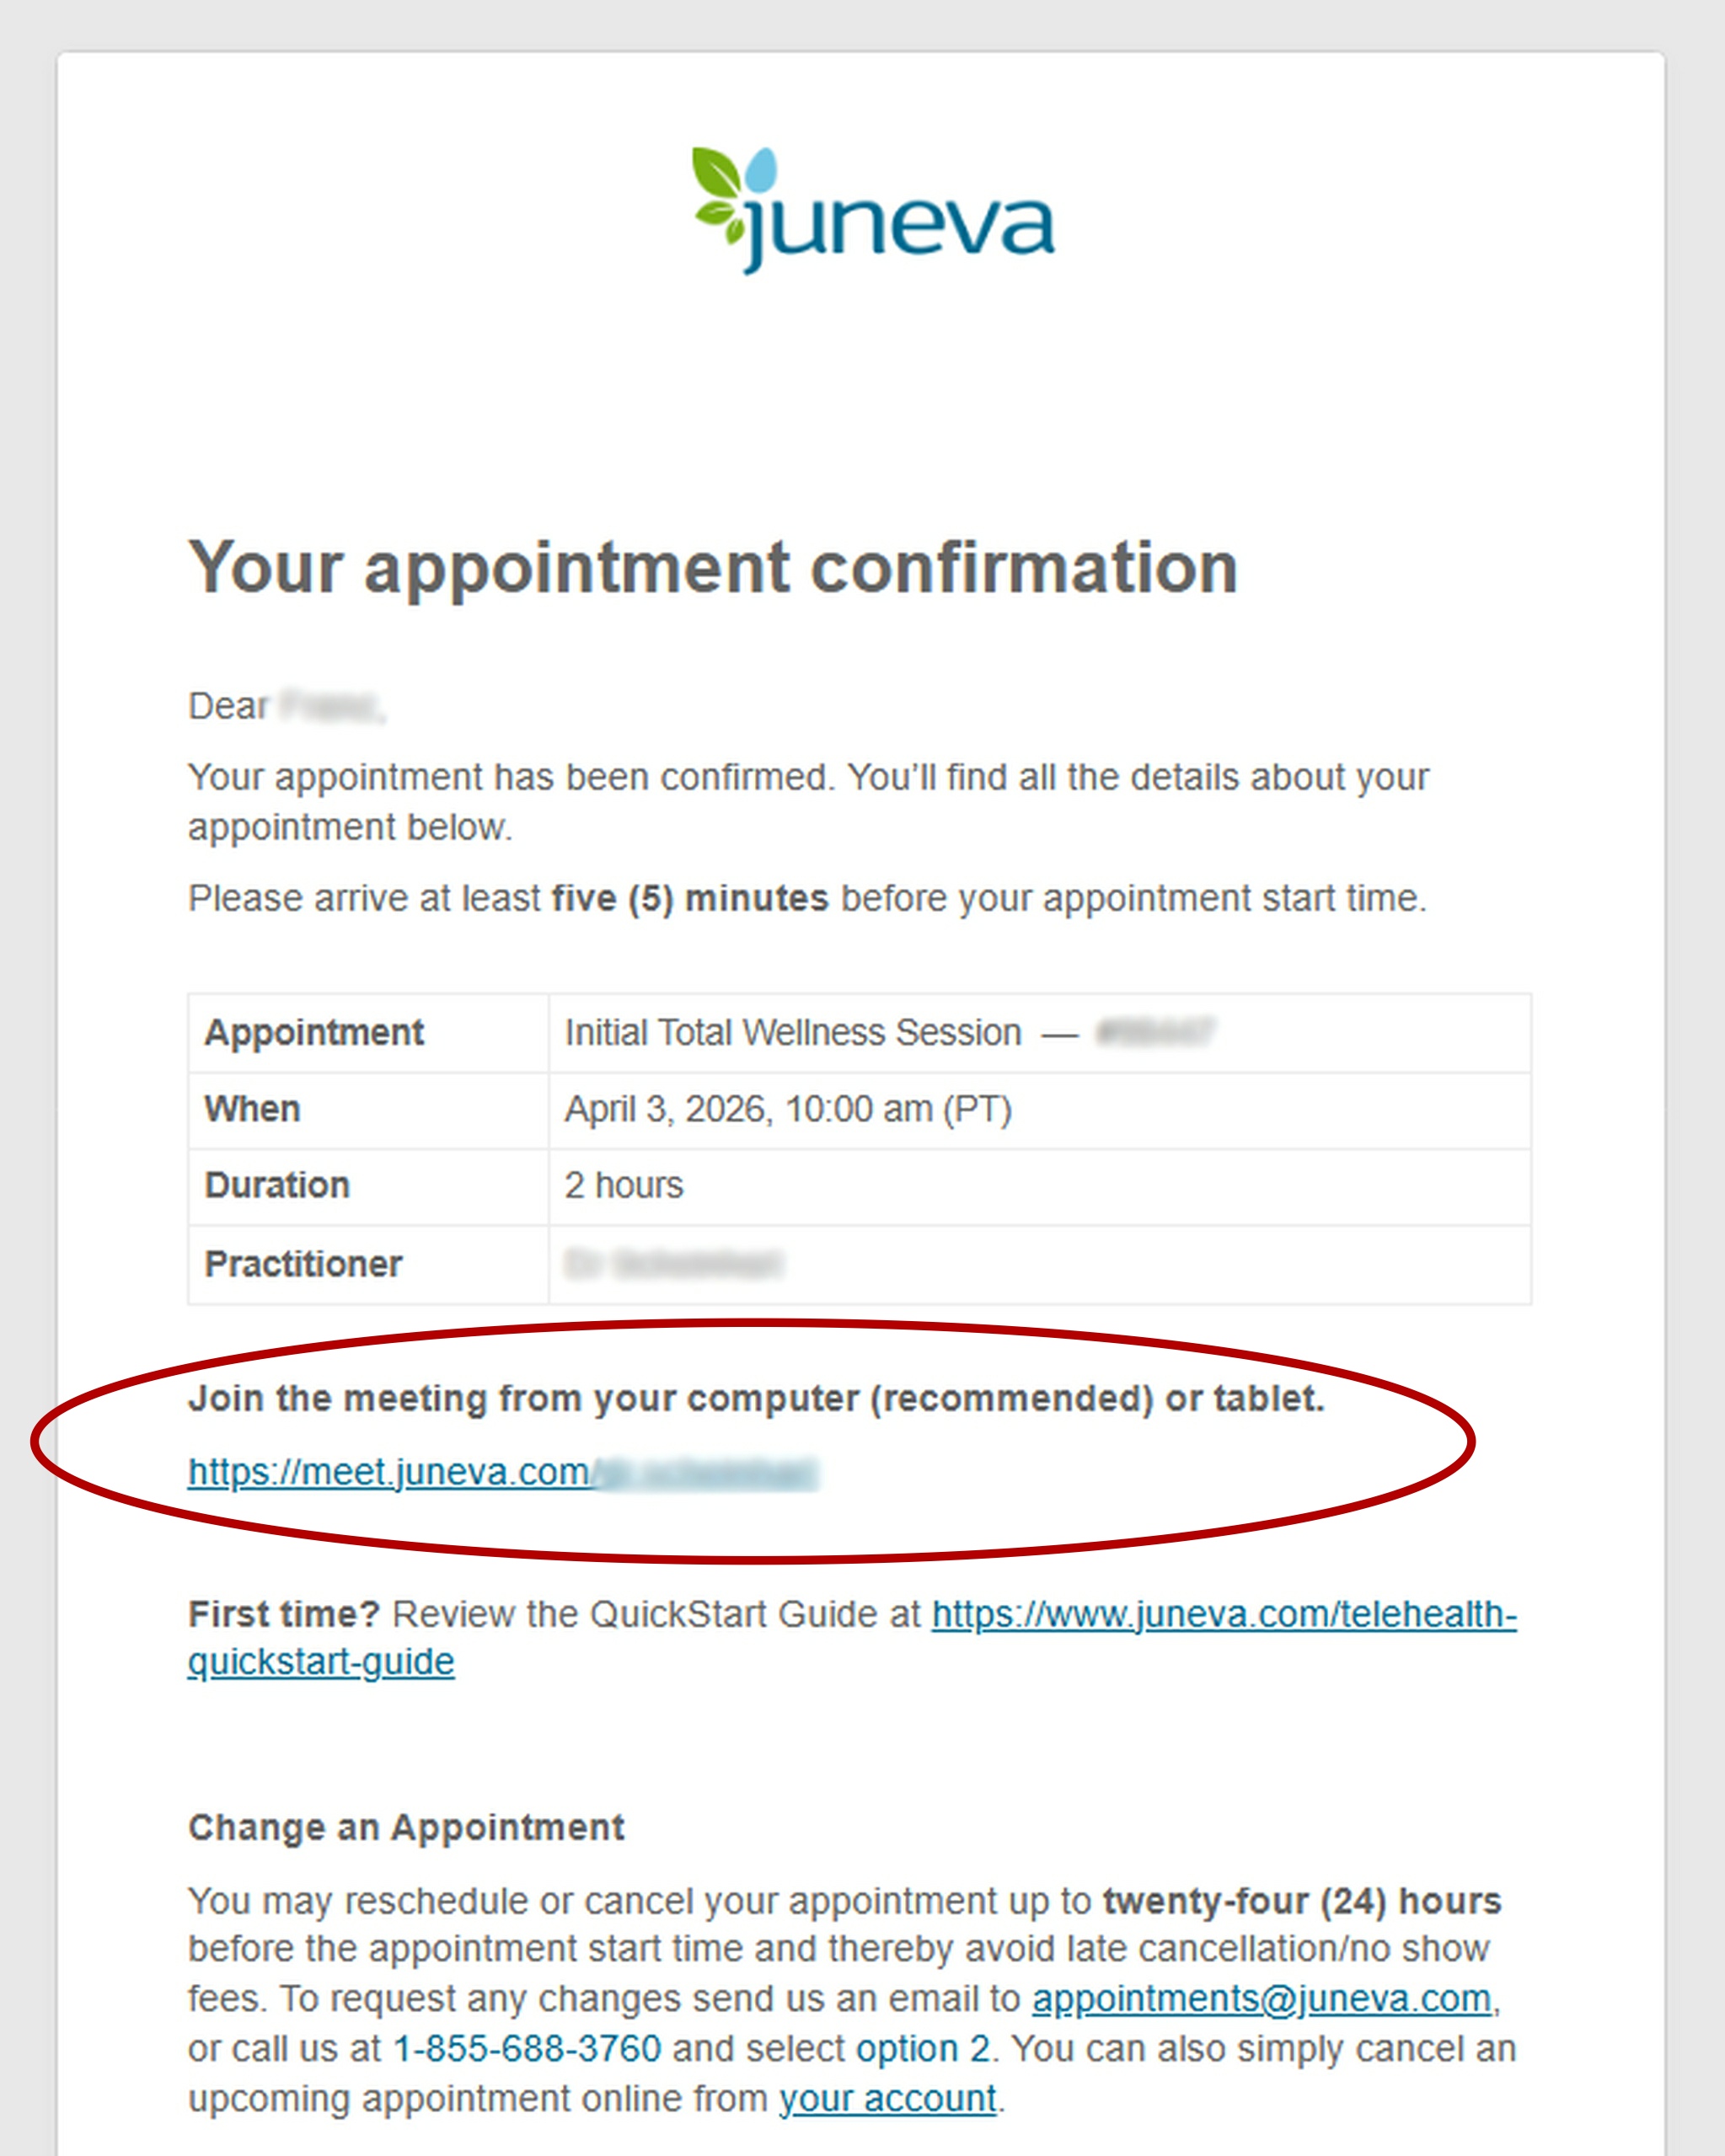
Join your Telehealth (remote) session by using the link you received in your appointment confirmation/reminder email (see example below).
Prerequisite
To perform a remote body-field scan:
Using a Windows or Mac computer, you need:
- Computer running Windows (7 or later) or Macintosh (10.9 or later) operating system.
- Mobile Scanner or miHealth (old V1 only) connected to computer via USB.
- BioSync application software installed on computer.
Using a Mobile device, you need:
- Mobile device running Apple (iOS 11 or later) or Android (OS 5 or later) operating system.
- Mobile Scanner or miHealth (new V2 only) connected to mobile device via Bluetooth.
- Energy4Life application software installed on mobile device.
Both options require an internet connection to install the application and to perform the scan.
Download App
For remote scanning, download and install the appropriate BioSync application software – when you click the images below it should take you to the respective application download.
Install on Computer
- Click the button above to download the Windows Version of BioSync. Save the download file ‘BioSync.exe’ to your computer.
- Open the ‘Downloads’ folder, wait for the download to complete.
- Once download is complete, double click the downloaded file ‘BioSync.exe’ to start the installation.
- Follow the on screen instructions and click next in the installer.
- Once the application is installed click finish and BioSync will open automatically.
- Click the button above to download the Mac version of BioSync. Save the download file ‘BioSync.dmg’ to your computer.
- Open the ‘Downloads’ folder, wait for the download to complete.
- Once download is complete, double click the downloaded file ‘BioSync.dmg’ to start installation.
- A new window should appear, drag the icon on the left named ‘BioSync’ into the ‘Applications’ folder shown on the right. Close the window.
- Open the ‘Applications’ folder, search for ‘BioSync’, then double-click to open the application.
Install on Mobile devices
Download and install the Energy4Life application as you would any other application from either the Apple App Store or Google Play Store (depending on whether you have an Apple or Android device) – when you click the images below it should take you to the respective store. Once the application is installed, just open it.
![]()
![]()
SYSTEM REQUIREMENTS
Operating system
Windows 7 or later
Mac OS X 10.9 (Mavericks) or later
iOS 11 or later
Android OS 5 (Lollipop) or later
Internet connection
Computer: 1 Mbps or better (broadband recommended)
Mobile device: 3G or better (WiFi recommended)
Software
BioSync application (for computer)
Energy4Life application (for mobile device)
Hardware
2GB of RAM (minimum), 4GB or more of RAM (recommended)
Mobile device
iPhone 5 or later
iPad 3rd gen or later
Android OS 5 (Lollipop) or later
Scanning from Computer
Plug In Your miHealth or Mobile Scanner
Plug your miHealth/Mobile Scanner into a USB port on your computer. If it is a miHealth device, turn the device on to act as a scanner. Place the miHealth upside down so the two big silver electrodes are on the top and the screen is at the bottom.
Using BioSync
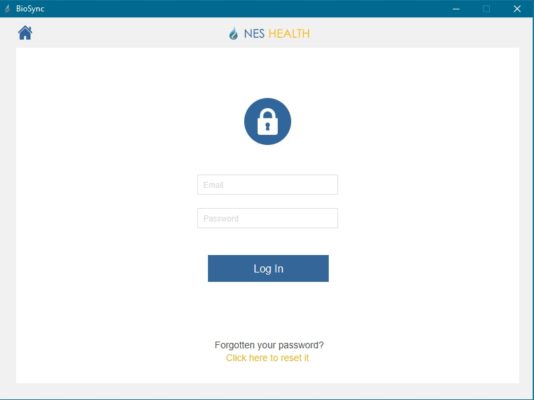
Open the BioSync application and you will be presented with three options. (You must be online – connected to the internet – to use BioSync, as it will send your scan results to your practitioner. Its other features also require an internet connection.)

You should see this screen above upon opening the application and see the online status in the application footer. A green circle with “Online” will show when BioSync has detected an internet connection. A red dot with “Disconnected” will show if no internet connection is detected.
Scanning
Click ‘Scan’. You will be asked to login to the app. You should use your Total Wellness Portal login with your email address and password provided by us in your welcome email. If you need help, please contact us.
You should see the following screen below after you successfully logged in. A red circle with “Please place your hand on the scanner” will show in the footer of the application.
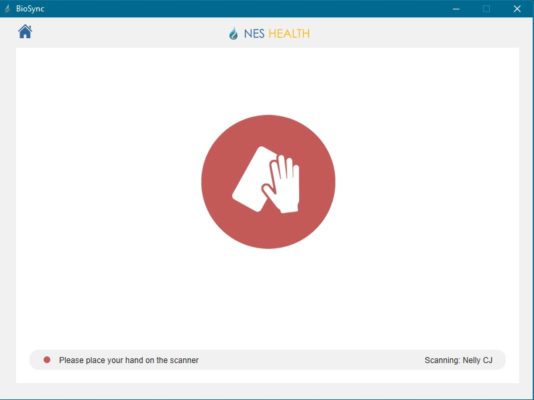
Place your hand on the scanner. If you’re using a miHealth as your scanner, place your hand so it touches the two big silver electrodes.
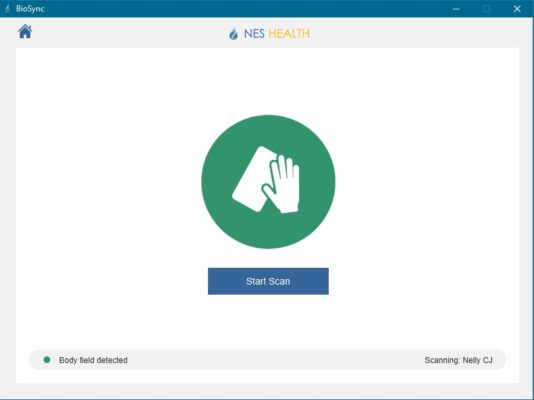
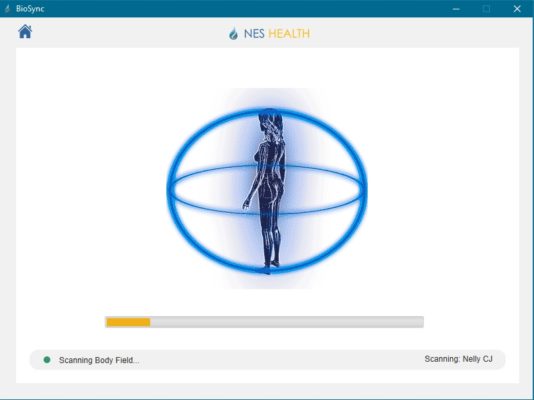
When you see the green circle with “Body-Field Detected” in the footer of the application, click “Start Scan” and you will see the scanning animation. Please keep your hand on the device throughout the duration of the progress bar and until it is indicated that the scan is complete.
At the end of the scan, the following message box will appear. This completes the scan.
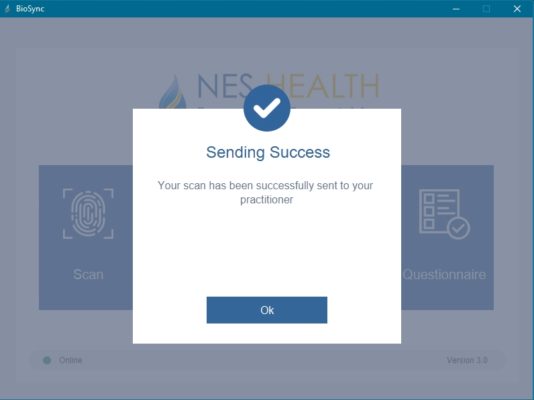
Your scan will be automatically uploaded to your practitioner once the process has completed. You can close the BioSync application and disconnect the miHealth/Mobile Scanner from the computer.
Congratulations! You have completed your scan.
Scanning from Mobile device
Check Your miHealth
Before you start a scan, turn on the miHealth and make sure its Bluetooth function is enabled in Settings > Bluetooth. Then enable ‘Treatment Mode’ following these steps:
- Select ‘Session > Programs’ from the Home screen.
- Select ‘BWS Scan’ folder and select the program also named ‘BWS Scan’.
If you do not see the ‘BWS Scan’ folder we recommend connecting to Wi-Fi and go to Settings > Update Device to download the latest software version.
- Ensure ‘On Body’ is toggled ON.
- Select Start to begin the session.
Place the miHealth upside down so the two big silver electrodes are on the top and the screen is at the bottom.
Check Your Scanner
Before you start a scan, you should touch the top of your Mobile Scanner. A green light should come on and a short vibration should be felt. If this doesn’t happen, please ensure your device is charged by plugging it into a computer or USB plug with the supplied cable. The device light will flash red when charging. The light will turn solid red when charging is completed.
Using Energy4Life Application
Open the app as you would any other app on your mobile device. You will be asked to login to the app. You should use your Total Wellness Portal login with your email address and password provided by us in your account activation email. If you have forgotten your email address associated with your account, please contact us. If you have forgotten your password, use the password reset function at https://portal.e4l.com.

Scanning
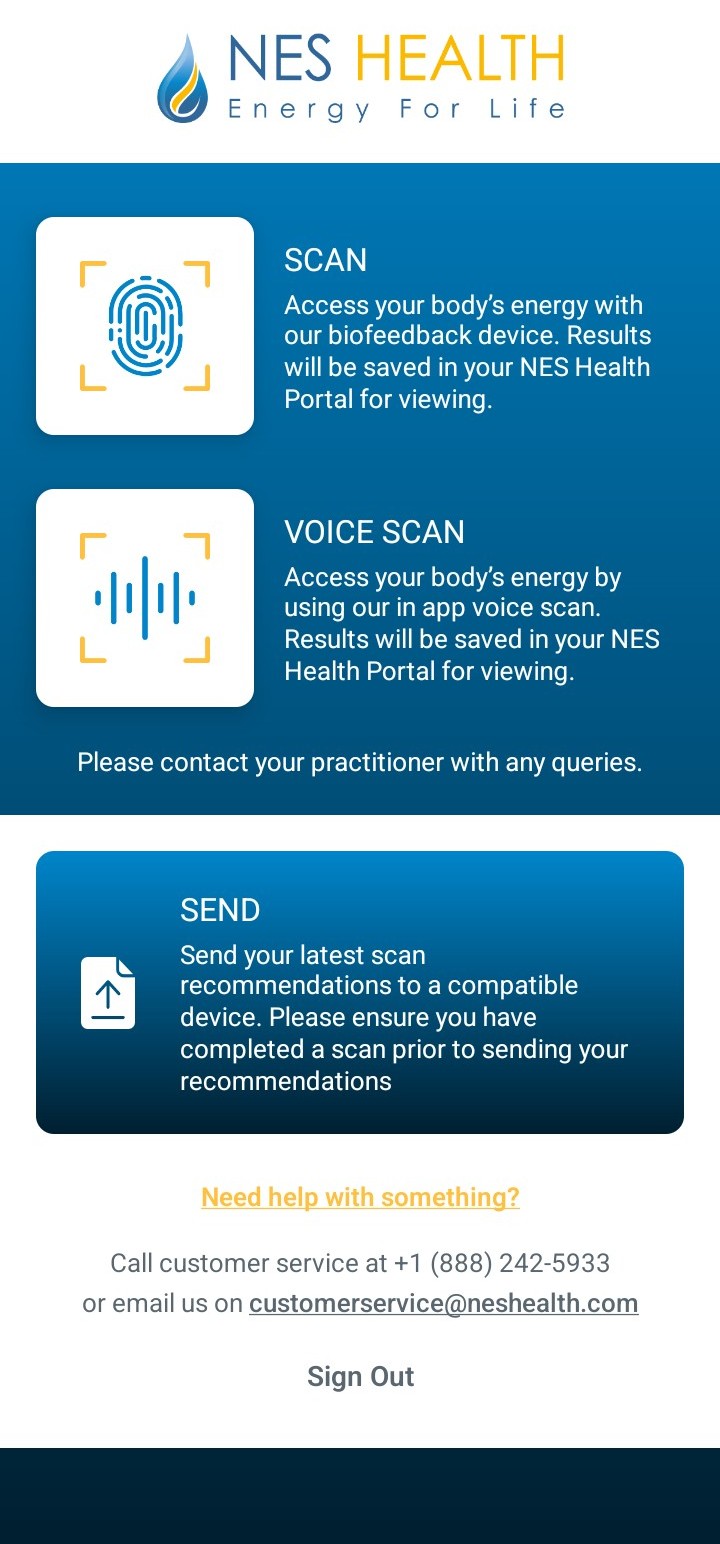
Once logged in, click “Scan“.
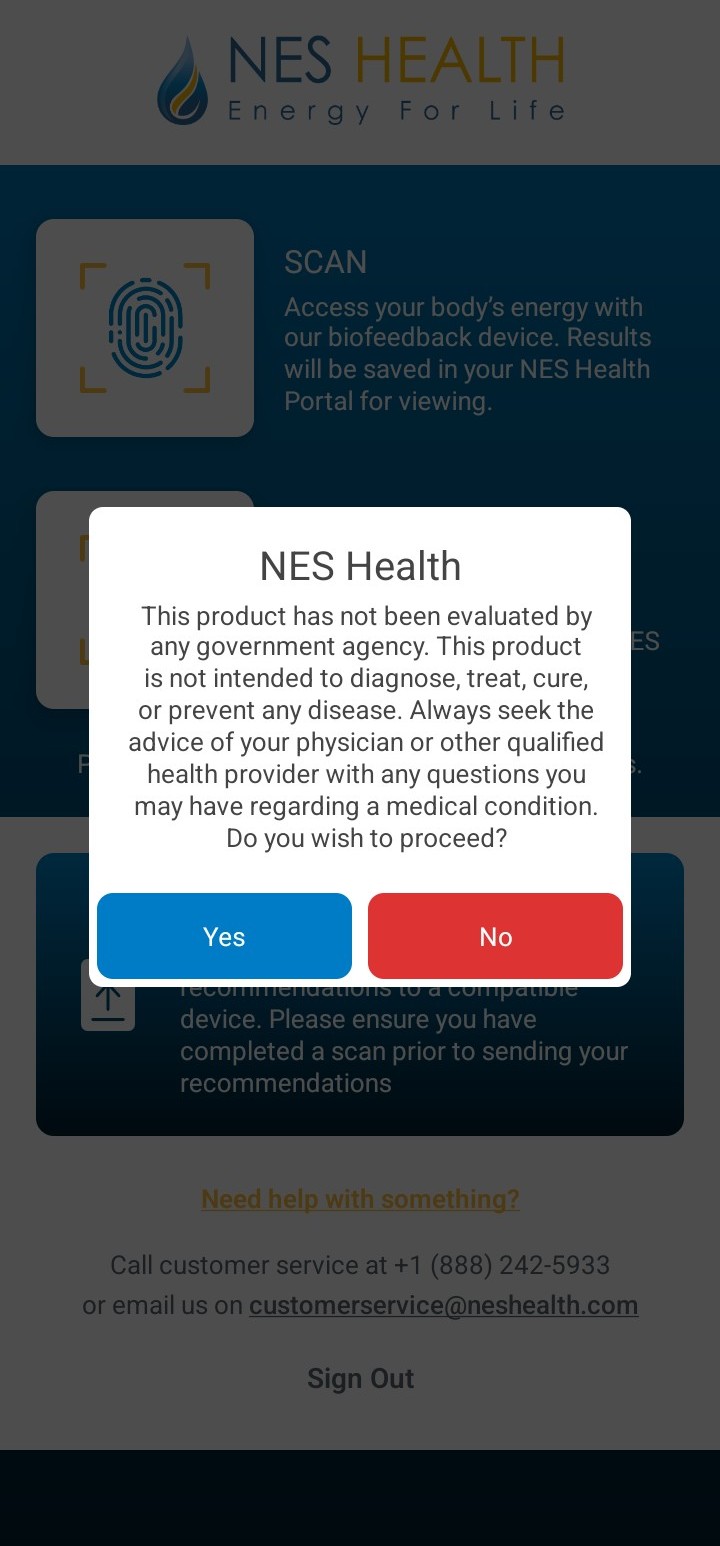
You will be asked if you wish to proceed following a confirmation message – click ‘Yes‘. Your app may also ask for permission to use Bluetooth. Click ‘OK‘ or ‘Allow‘.
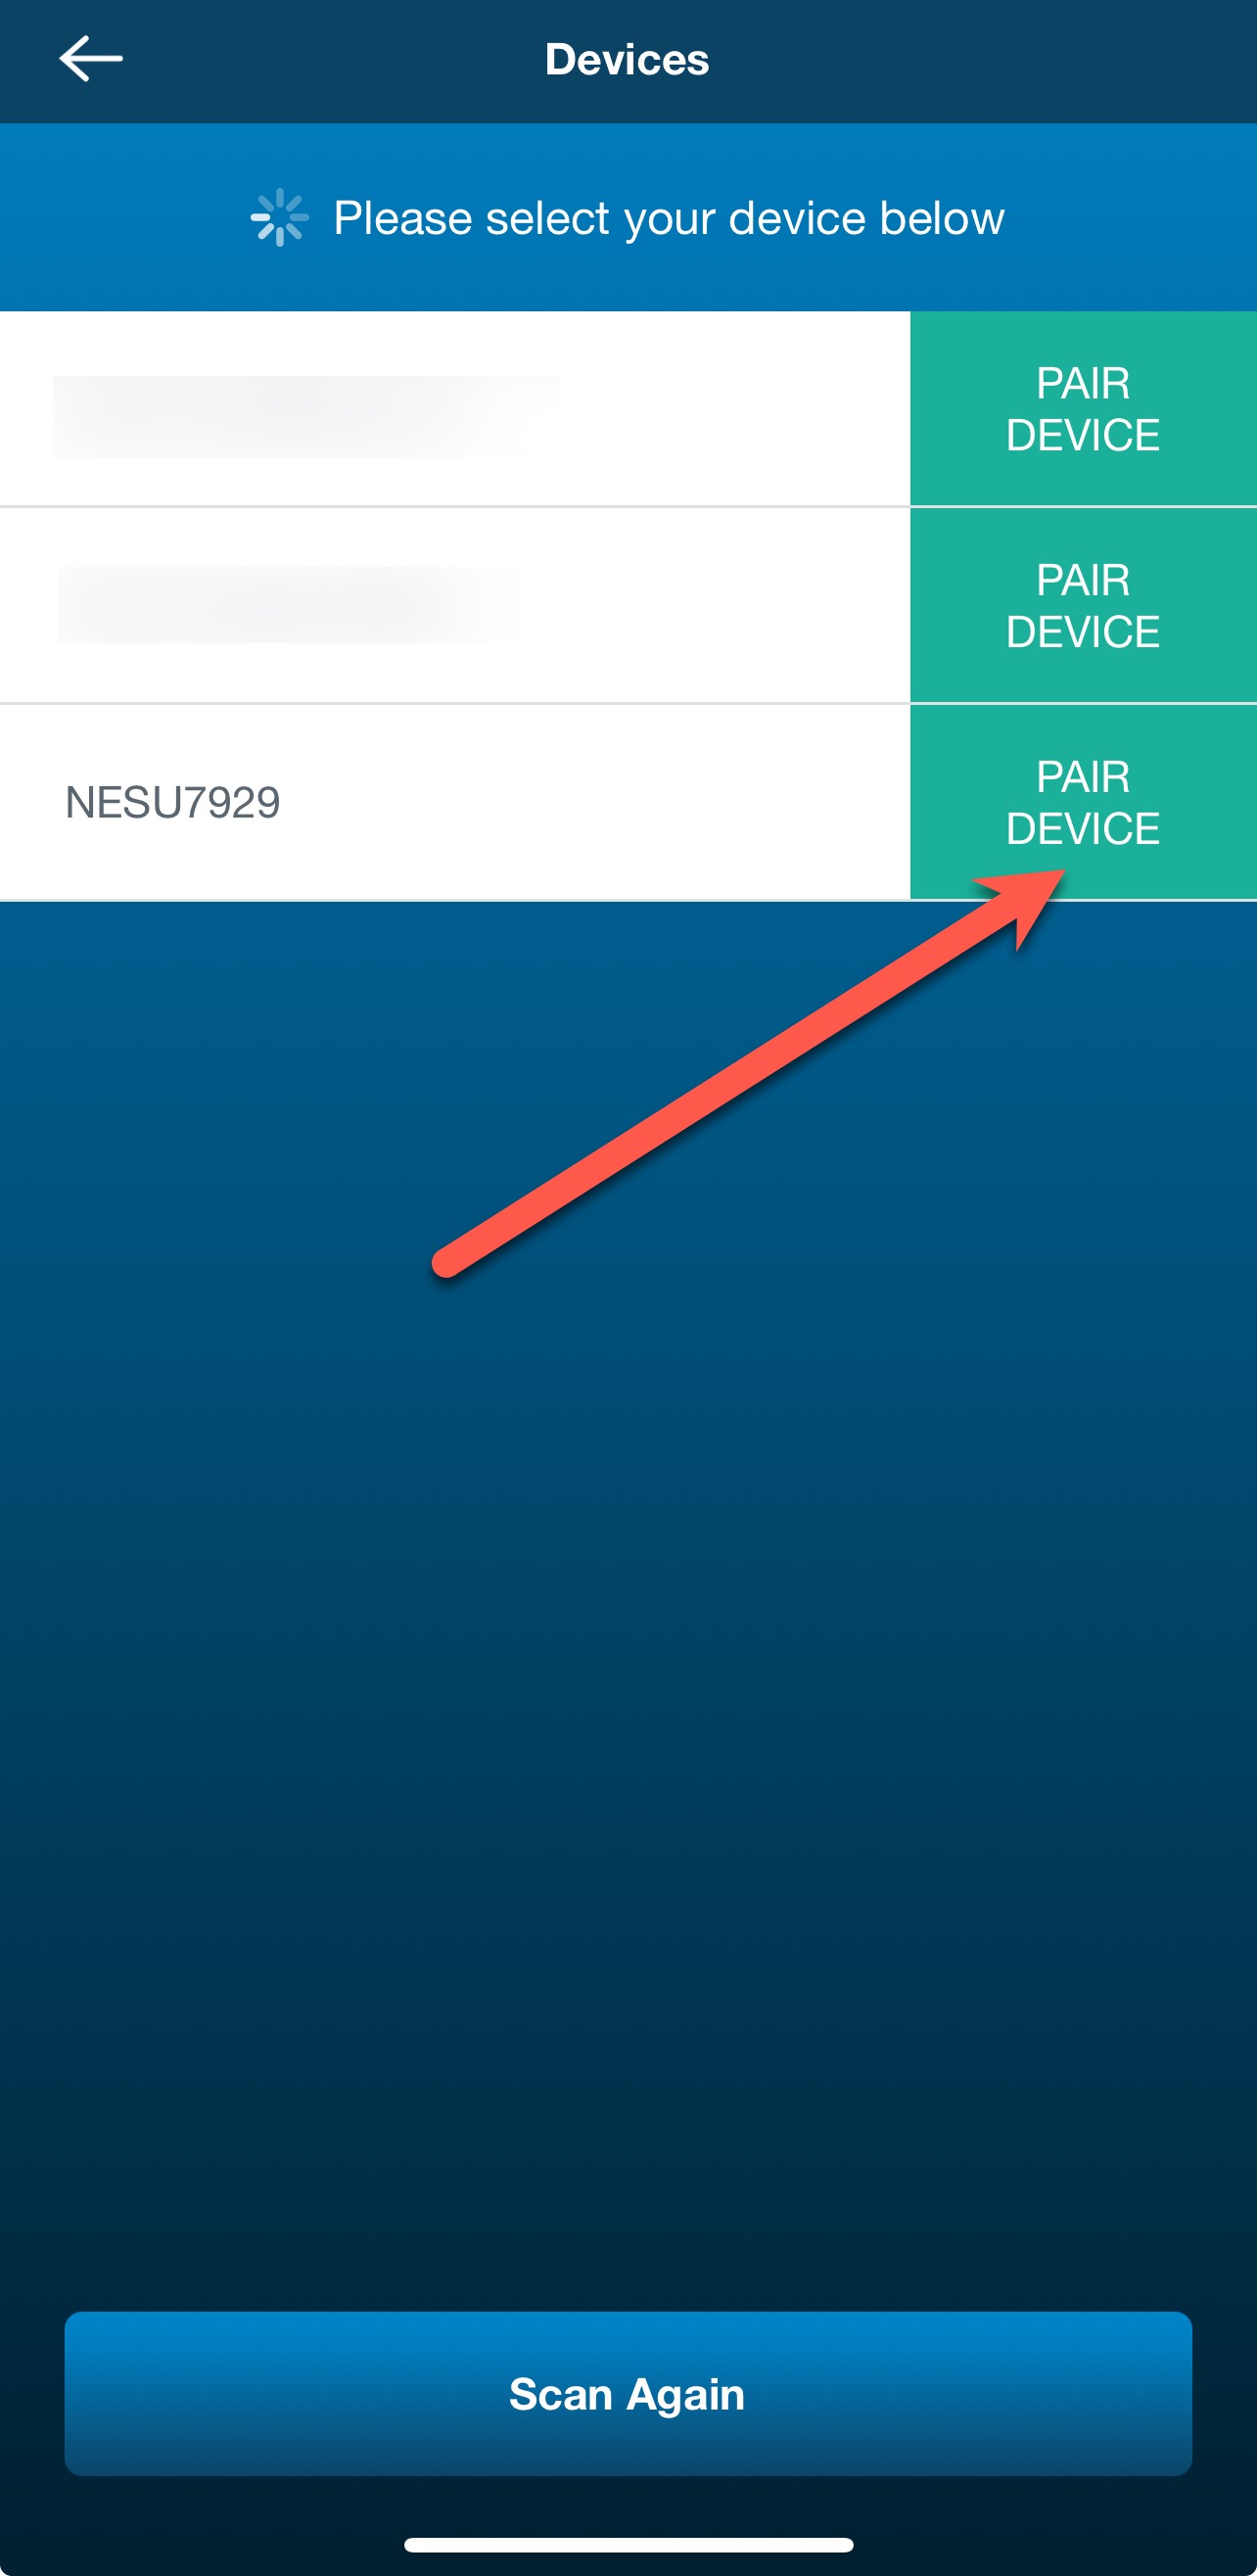
Your app will then start scanning for devices. All devices have a unique name. The Mobile Scanner name starts with “NES” while your miHealth device name starts with “Mi” so it should be easy to find. You can also check the bottom of your Mobile Scanner device for the unique name.
Once the device is identified by the app, click “Pair Device” in the app. The light on your Mobile Scanner will turn blue (means Bluetooth connection with your mobile phone/tablet is established). If you do not see a ‘NES…’ or ‘Mi…’ device listed in the app, double check your mobile phone/tablet’s Bluetooth is turned on (try turning it off and then on again) and a ‘NES…’ or ‘Mi…’ device shows in your paired device list.
We recommend placing your mobile device and Mobile Scanner or miHealth on a flat surface to make it easier when using two hands. You should see the following screen after you successfully paired with the Mobile Scanner or miHealth.
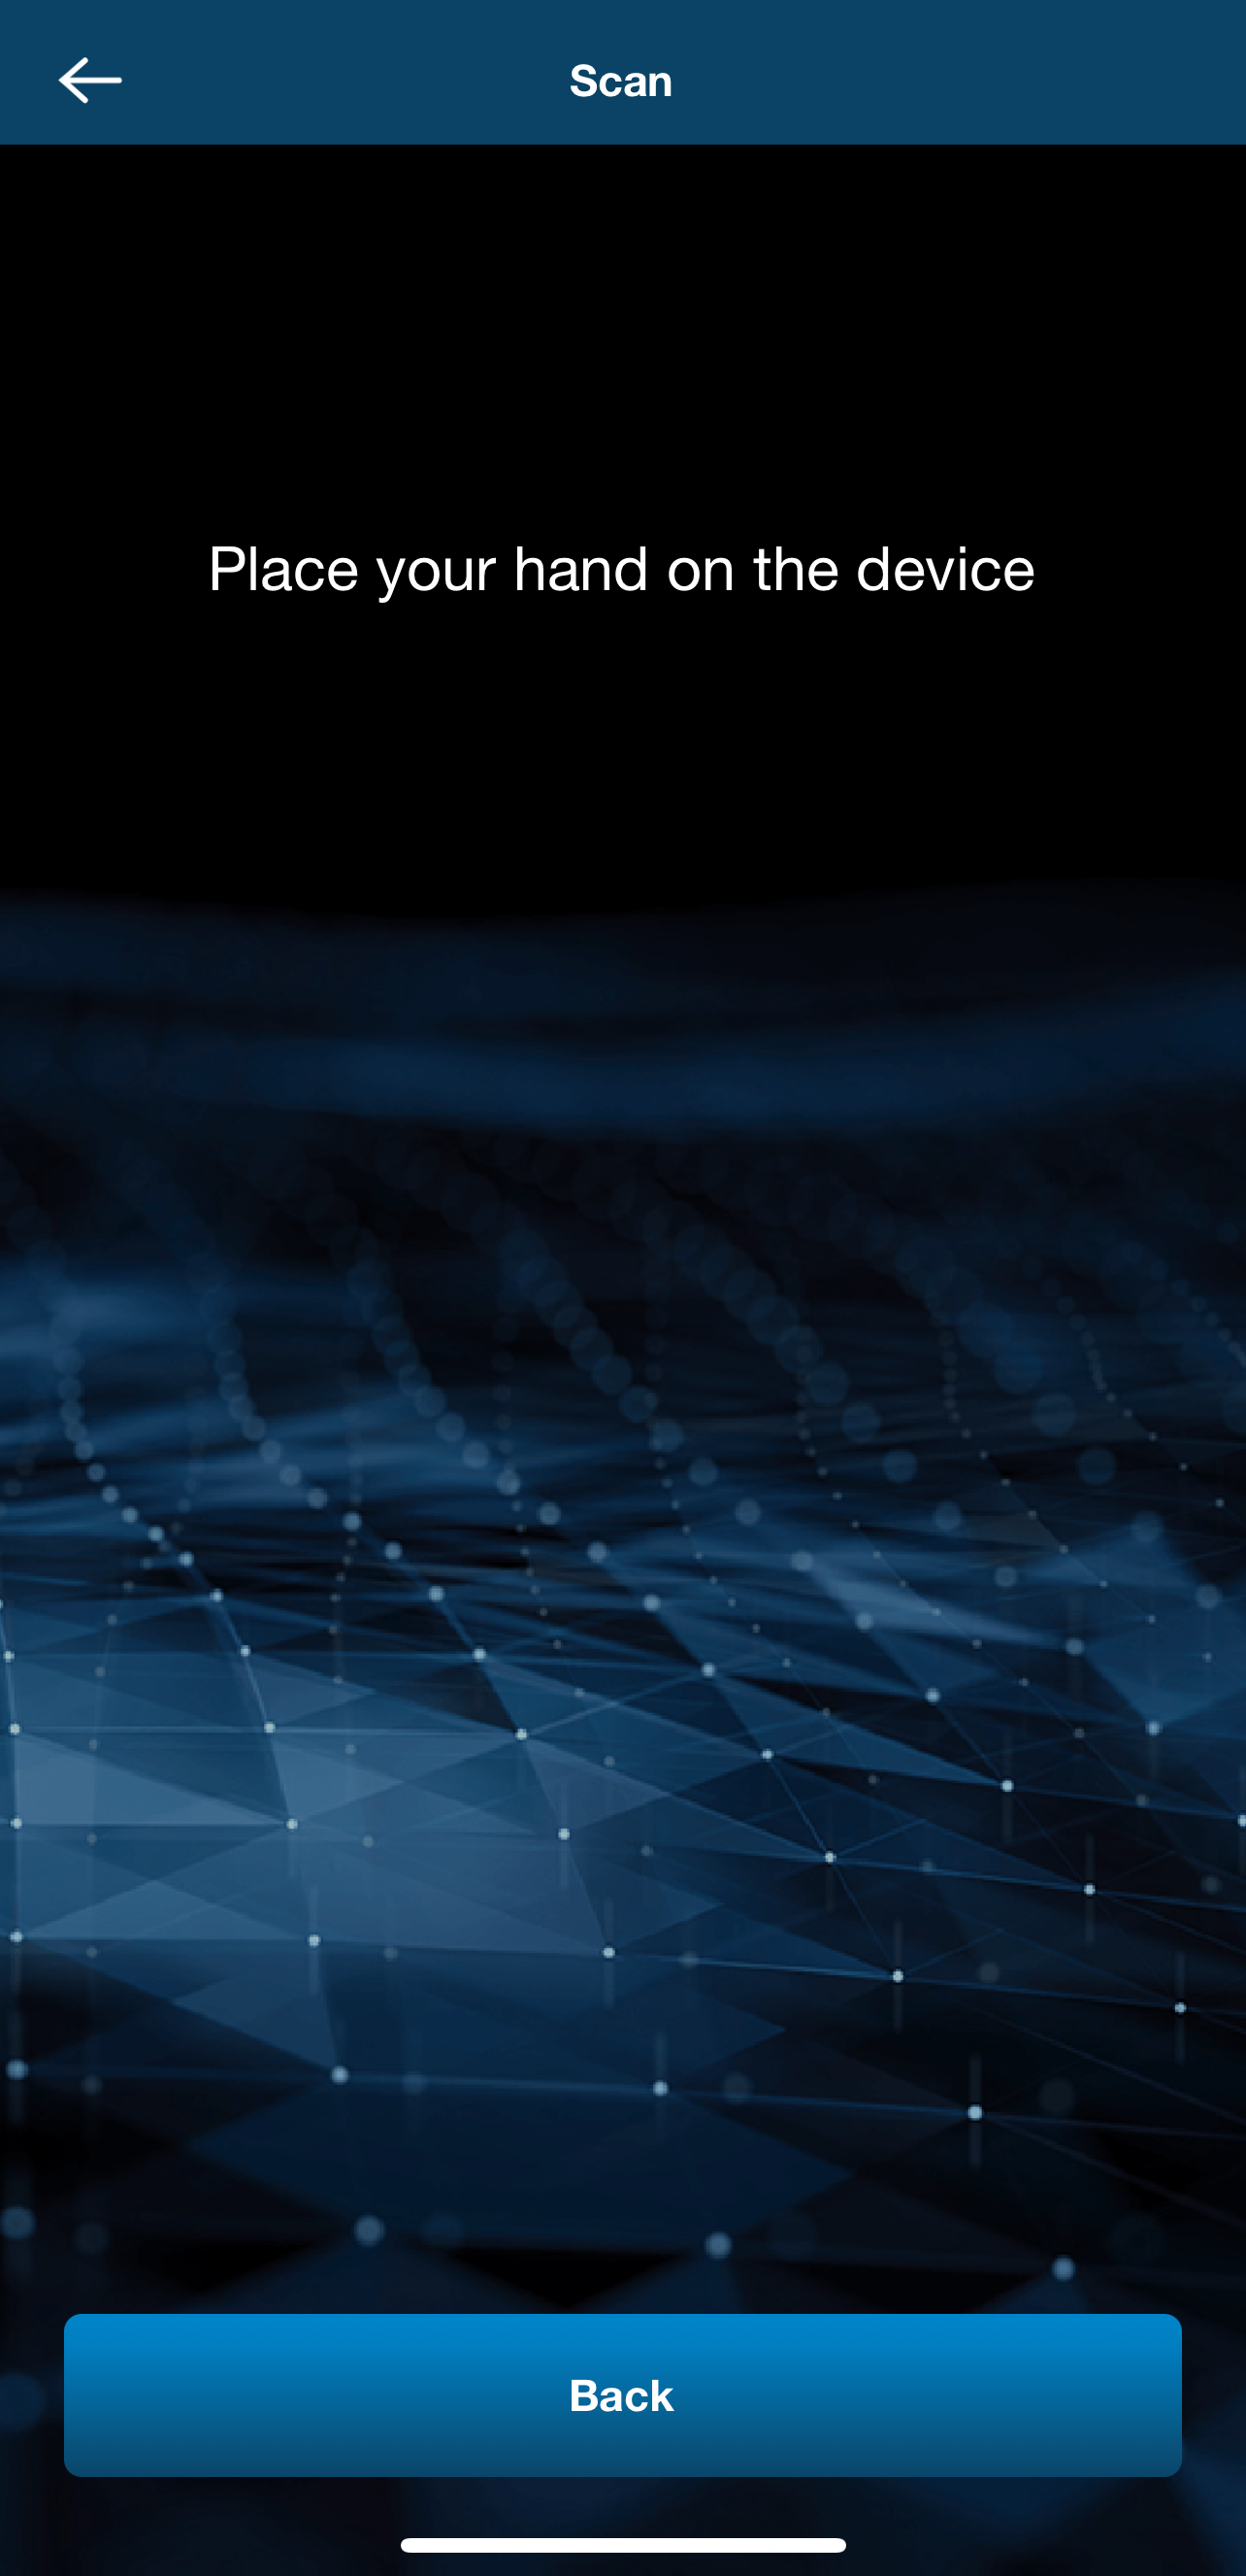
Place your hand on the Mobile Scanner or miHealth electrodes.
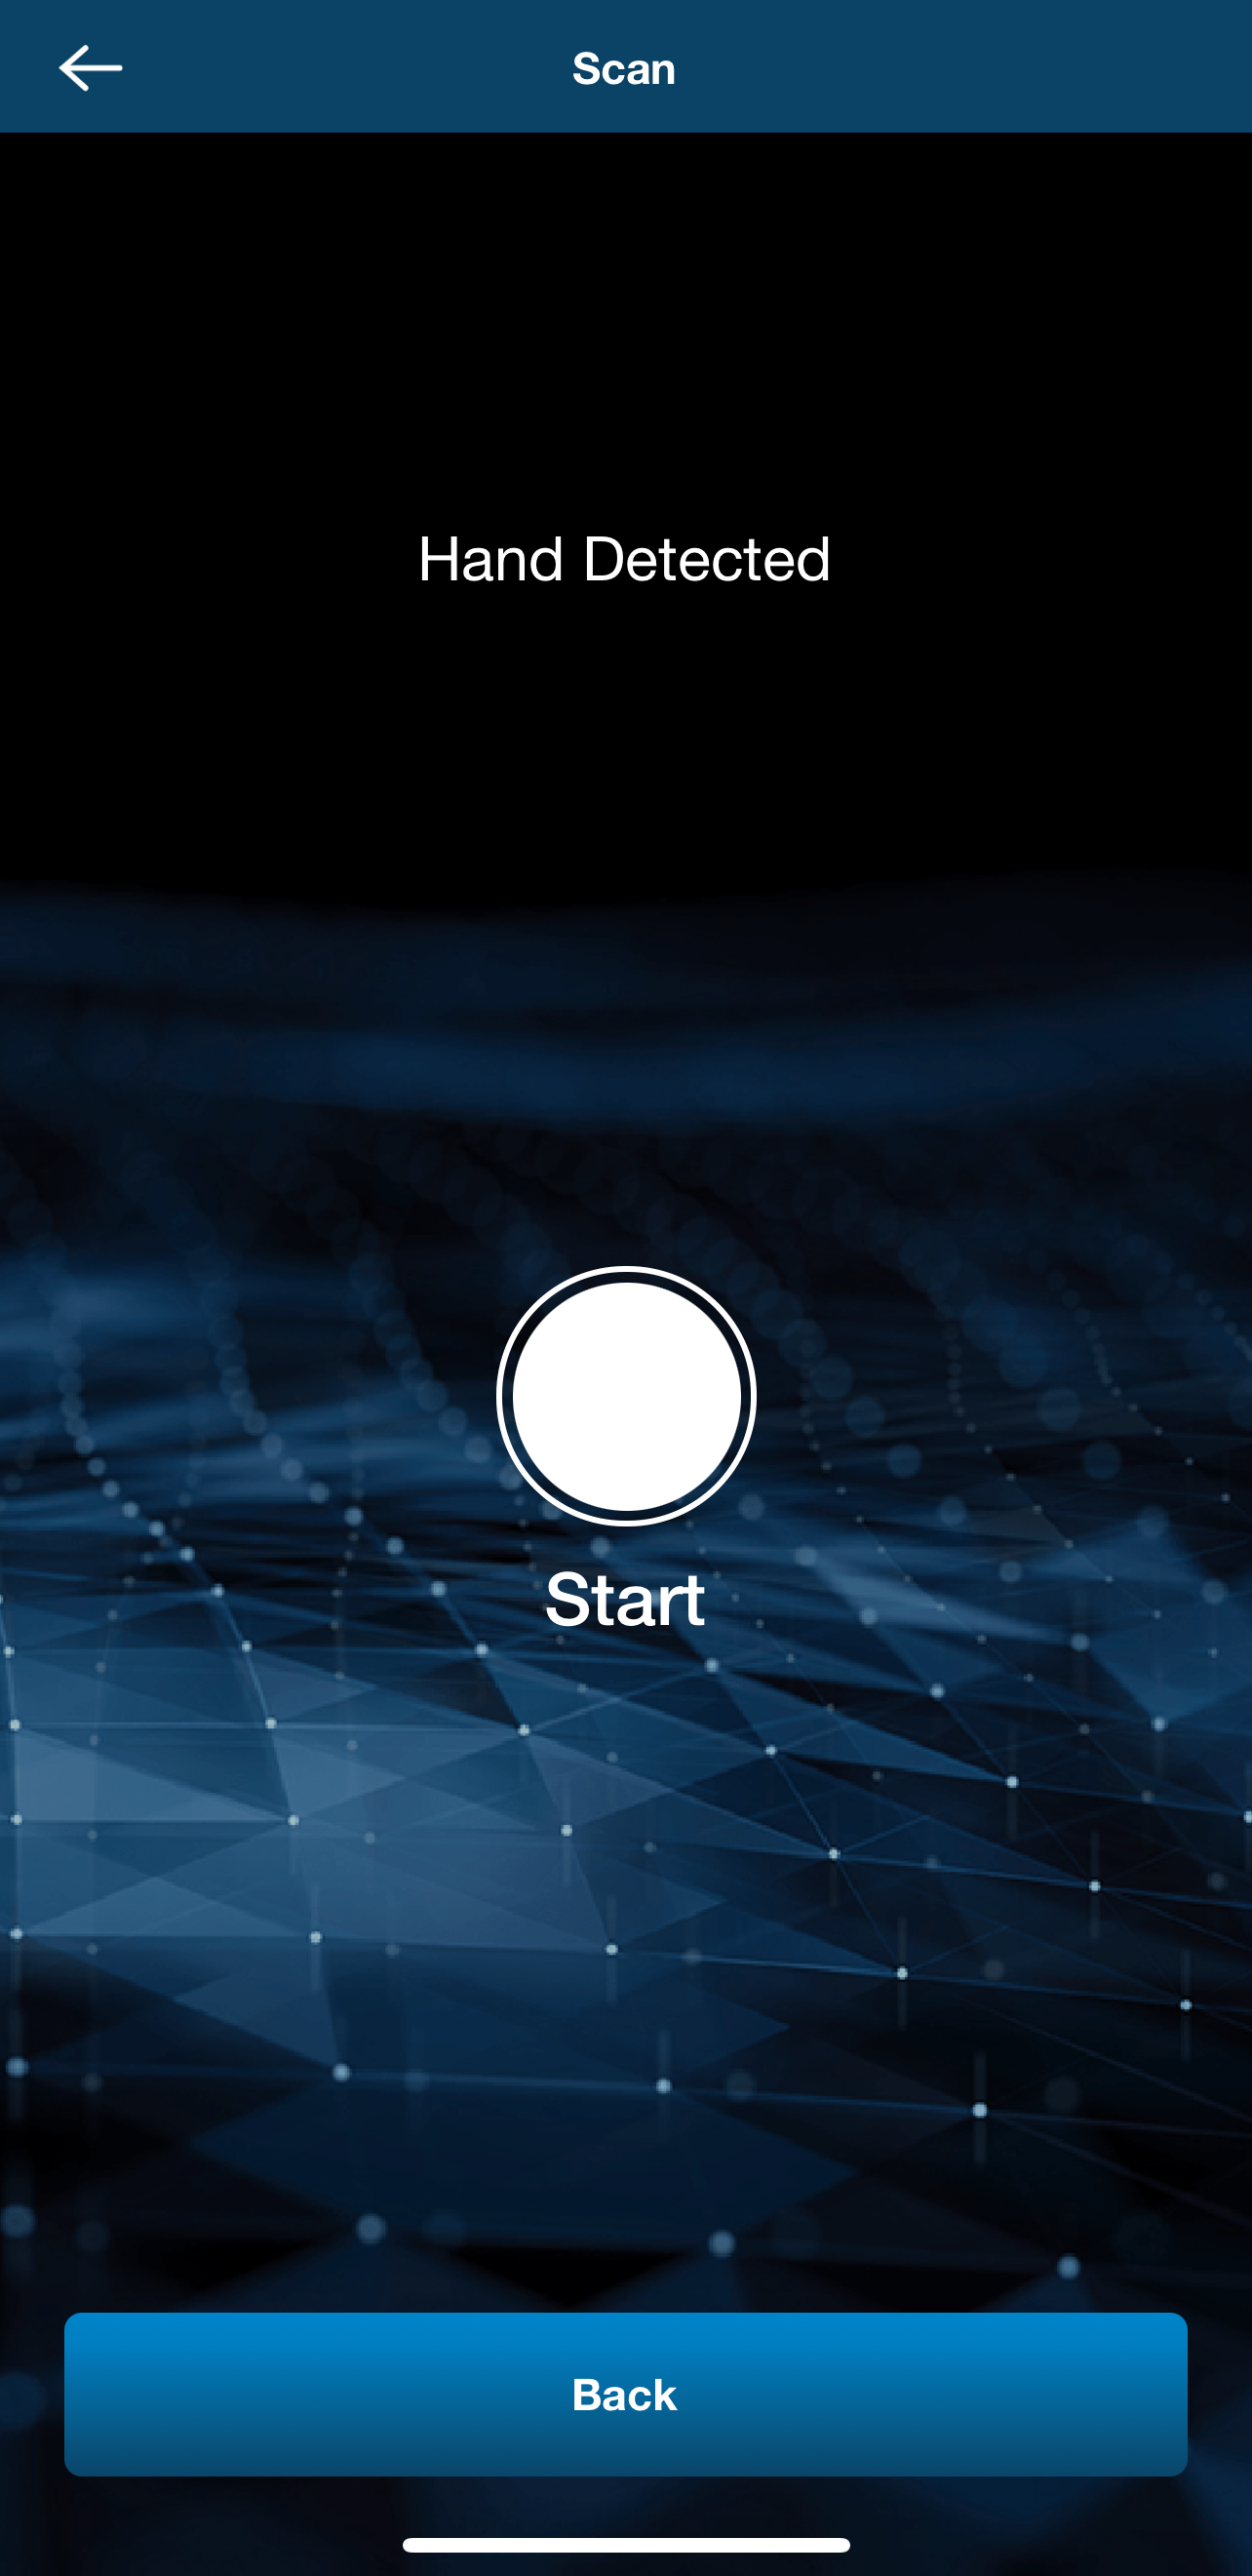
When you see the “Start” circle and “Hand Detected” displayed in the application, click “Start” and you will see the scanning animation.
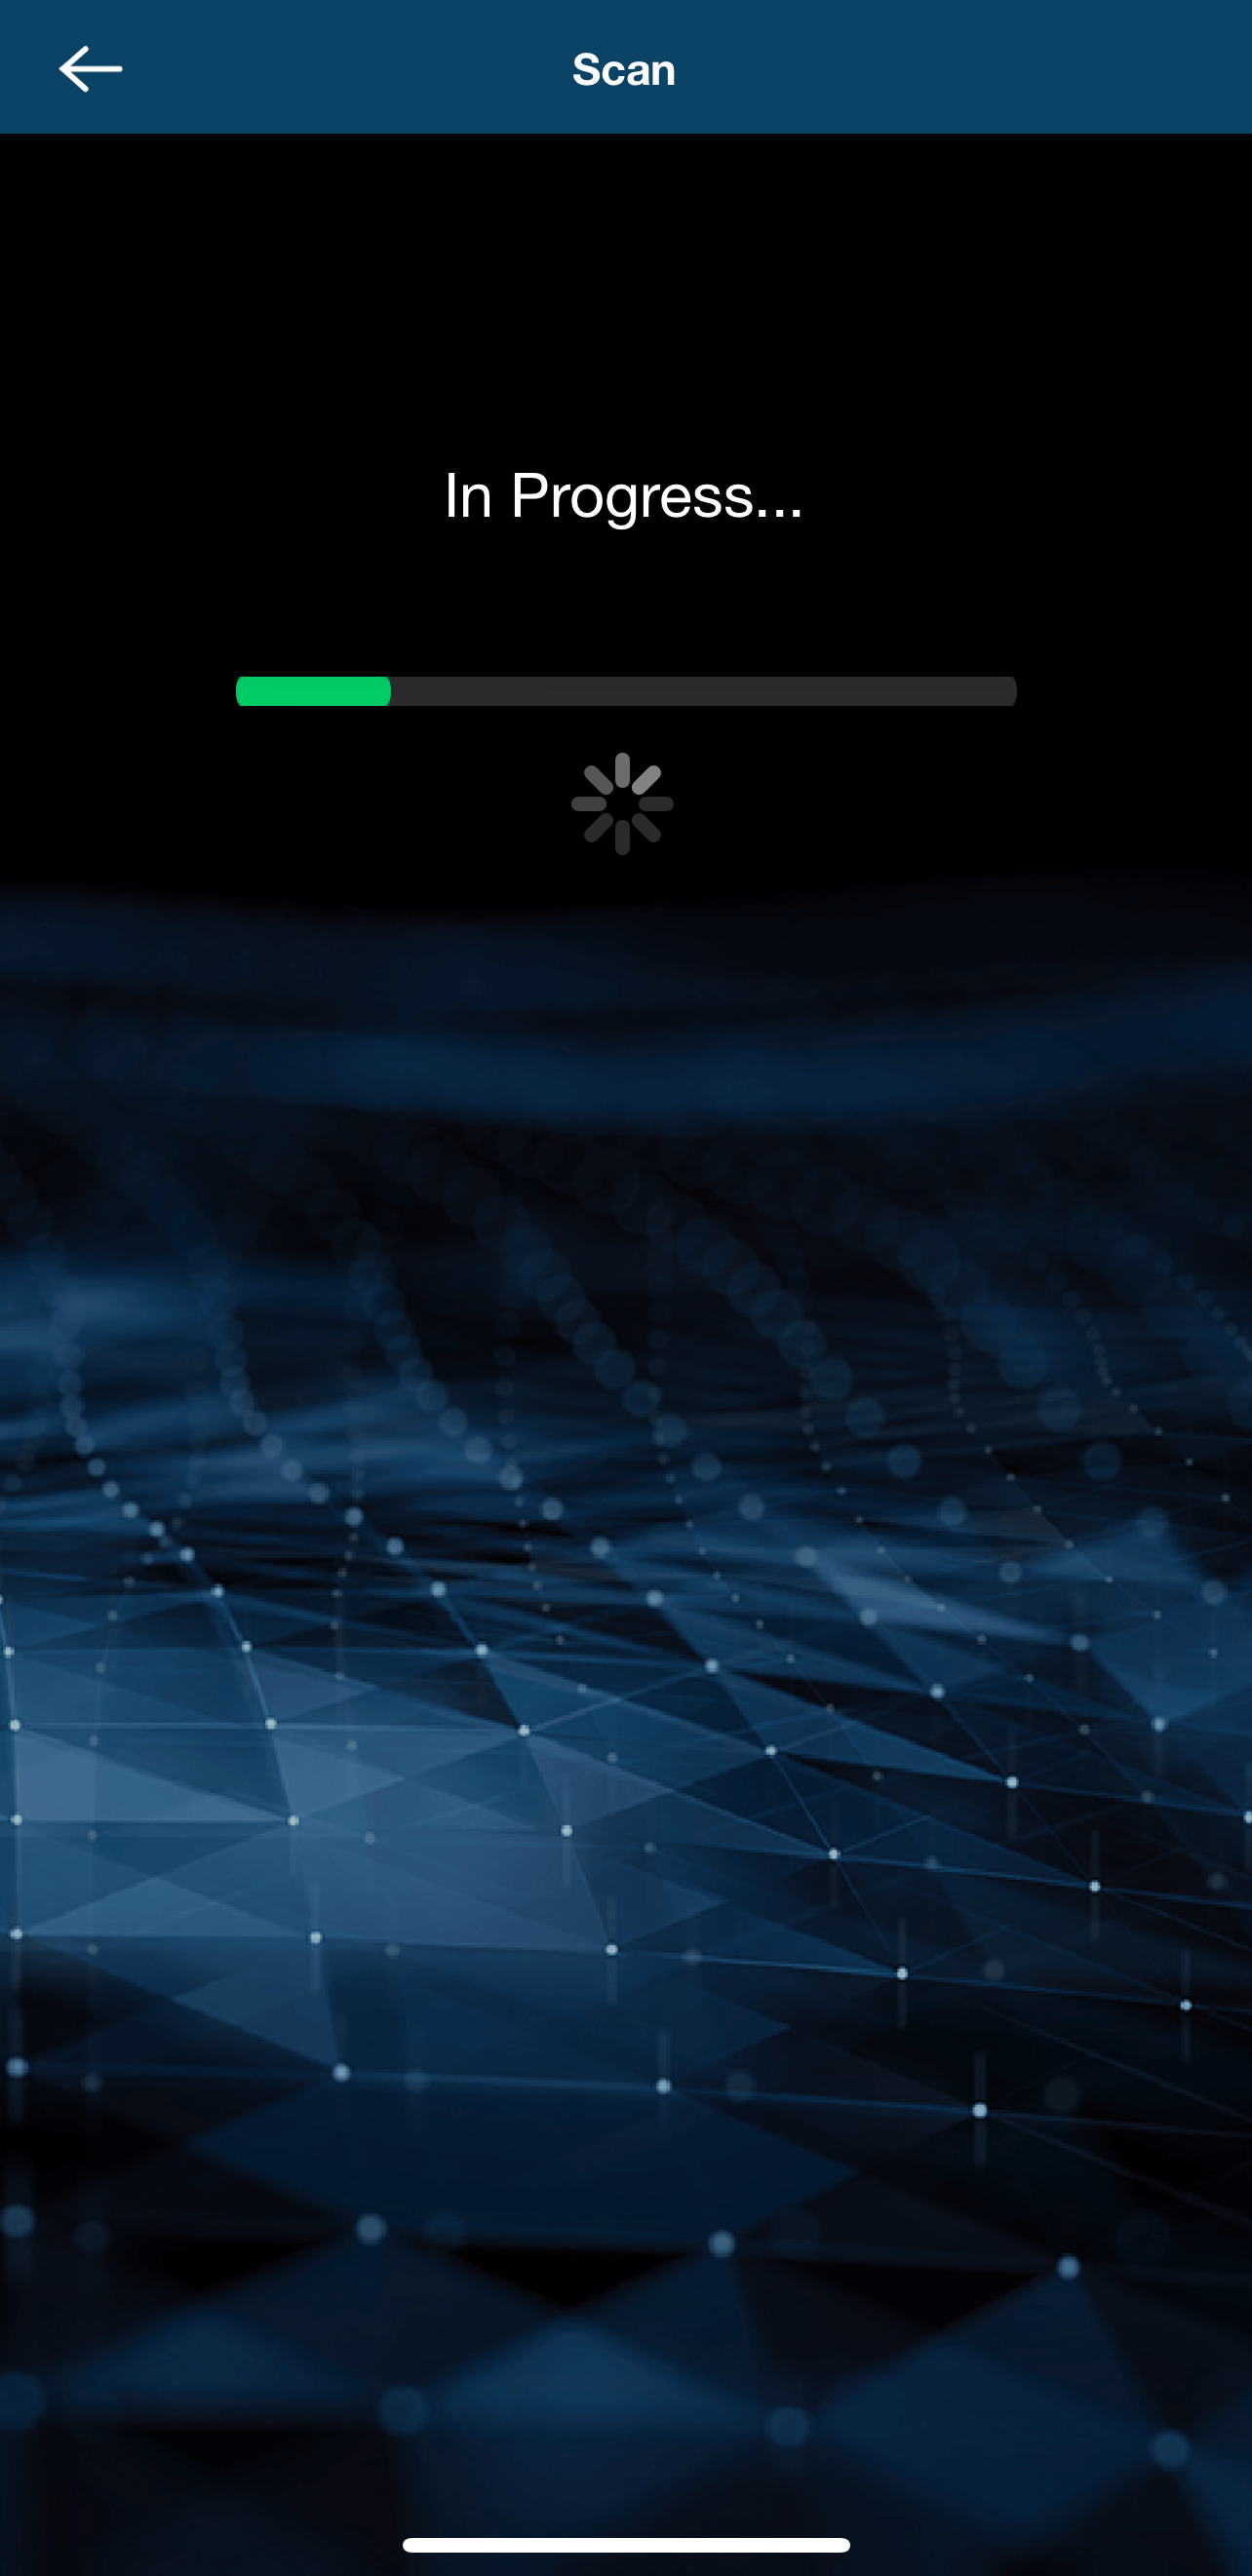
Please keep your hand on the device throughout the duration of the progress bar until it is indicated that the scan is completed.
Your scan will be automatically uploaded to your practitioner once the process has been completed. You can close the application and turn off your miHealth.
Congratulations! You have completed your scan.
Prerequisite
To perform a remote body-field scan with your voice:
Using a Windows or Mac computer, you need:
- Computer running Windows (7 or later) or Macintosh (10.9 or later) operating system.
- Supported web browser (Chrome, Firefox, Edge or Safari).
- Microphone (built-in or external connected).
Using a Mobile device, you need:
- Mobile device running Apple (iOS 11 or later) or Android (OS 5 or later) operating system.
- Option 1: Supported web browser (Chrome, Firefox, Edge or Safari), OR
- Option 2: Energy4Life application software installed (preferred option).
- Microphone (built-in or external connected).
Both options also require an internet connection to perform the scan.
NOTE: To activate the voice scan option for your account, reach out to your Juneva Health Team at assistance@juneva.com.
Scanning via Web Browser
Log Into Your NES Wellness Portal
You’ll find the link in your Juneva account area under ‘VIEW WELLNESS PORTAL’,
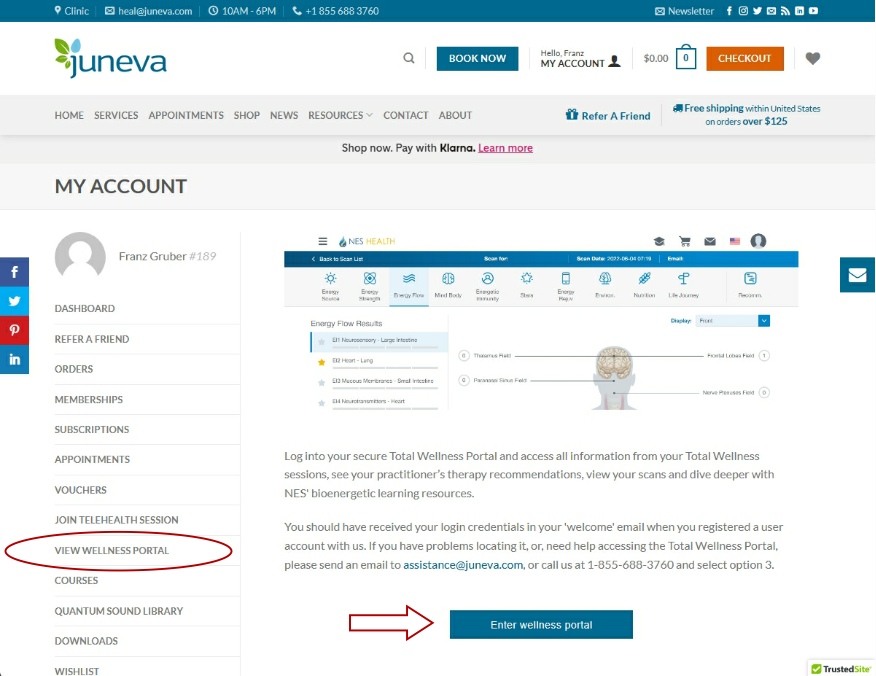
or you can just enter the following address into your internet browser:
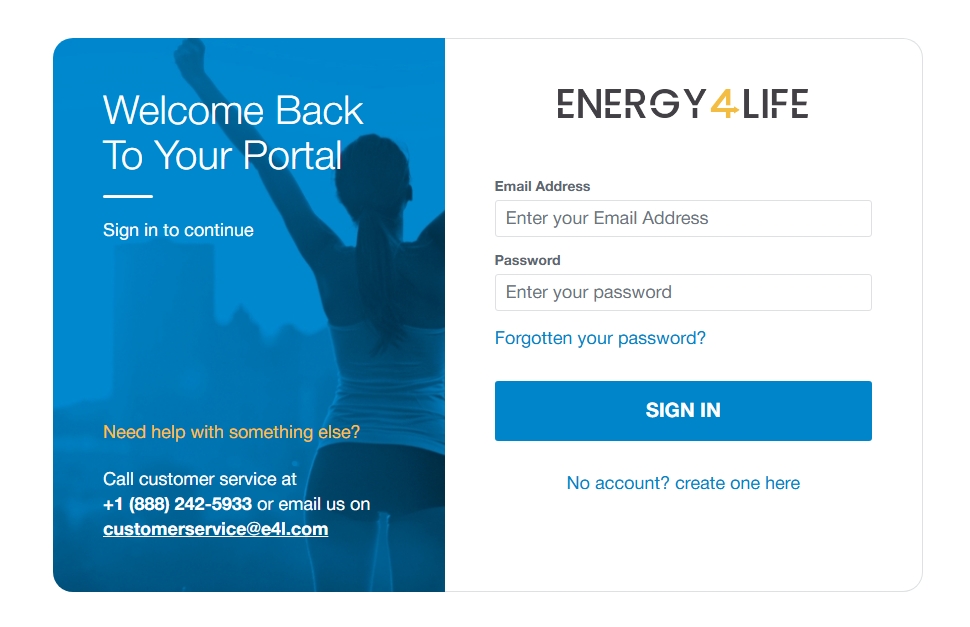 and then login using the credentials you received in your Juneva welcome email. If you’ve forgotten your password, you’ll find a password reset option on the login screen.
IMPORTANT: Do NOT create a new account!
If you are experiencing any issues logging into the Total Wellness Portal, please reach out to your Juneva Health Team for support at assistance@juneva.com.
Goto Your ‘Scans’
Click on “Scans” in your portal navigation as shown here:

Then click on “BWS Voice Scan” button as shown here:

Start Scanning / Voice Recording
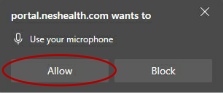
Allow access to your microphone when asked as shown here:
Then follow the instructions in the popup window and when ready click the ‘microphone’ button as shown here:
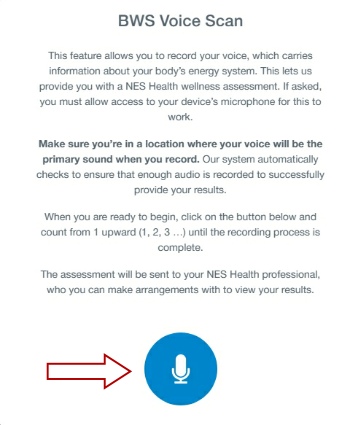
Start counting out loud while the scan is being performed.
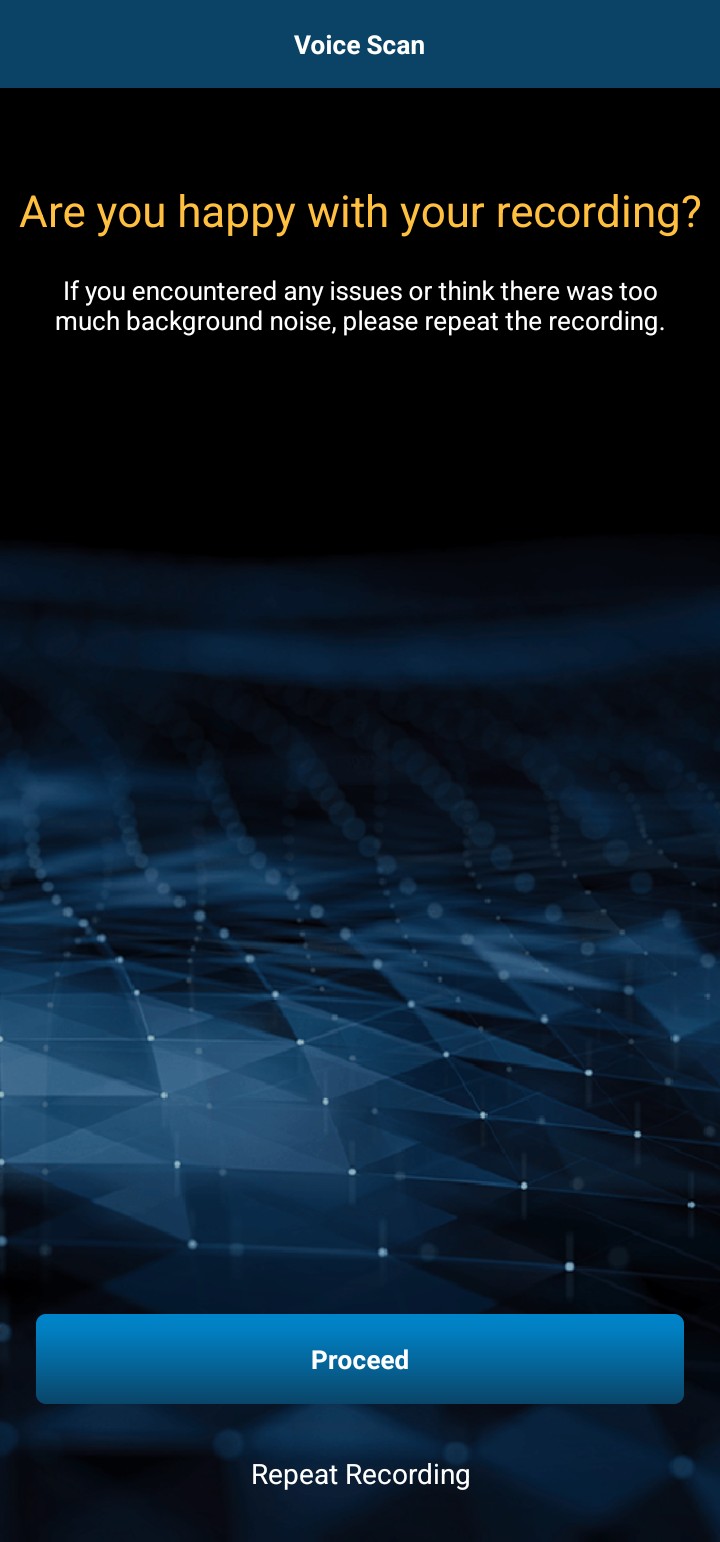
When it’s finished, you will have the option to Repeat Recording, if there were any problems, or click ‘Proceed‘ as shown here:

Your scan will be automatically uploaded to your practitioner once the process has been completed. You can close the web browser window or tab.
Congratulations! You have completed your scan.
Scanning via Mobile app
Install Energy4Life
Download and install the Energy4Life application as you would any other application from either the Apple App Store or Google Play Store (depending on whether you have an Apple or Android device) – when you click the images below it should take you to the respective store. Once the application is installed, just open it.
![]()
![]()
Using Energy4Life
Open the app as you would any other app on your mobile device. You will be asked to login to the app. You should use your Total Wellness Portal login with your email address and password provided by us in your welcome email. If you have forgotten your email address associated with your account, please contact us. If you have forgotten your password, use the password reset function at https://portal.e4l.com.
Scanning
Once logged in, click “Voice Scan“.
You will be asked if you wish to proceed following a confirmation message – click ‘Yes‘.
Follow the prompts and instructions. Click the microphone symbol to start the voice scan. You may be asked by the app to give permission to use your microphone in the app.

Start counting out loud while the scan is being performed.
When it’s finished, you will have the option to Repeat Recording, if there were any problems, or click ‘Proceed’.
Your scan will be automatically uploaded to your practitioner once the process has been completed. You can close the application.
Congratulations! You have completed your scan.